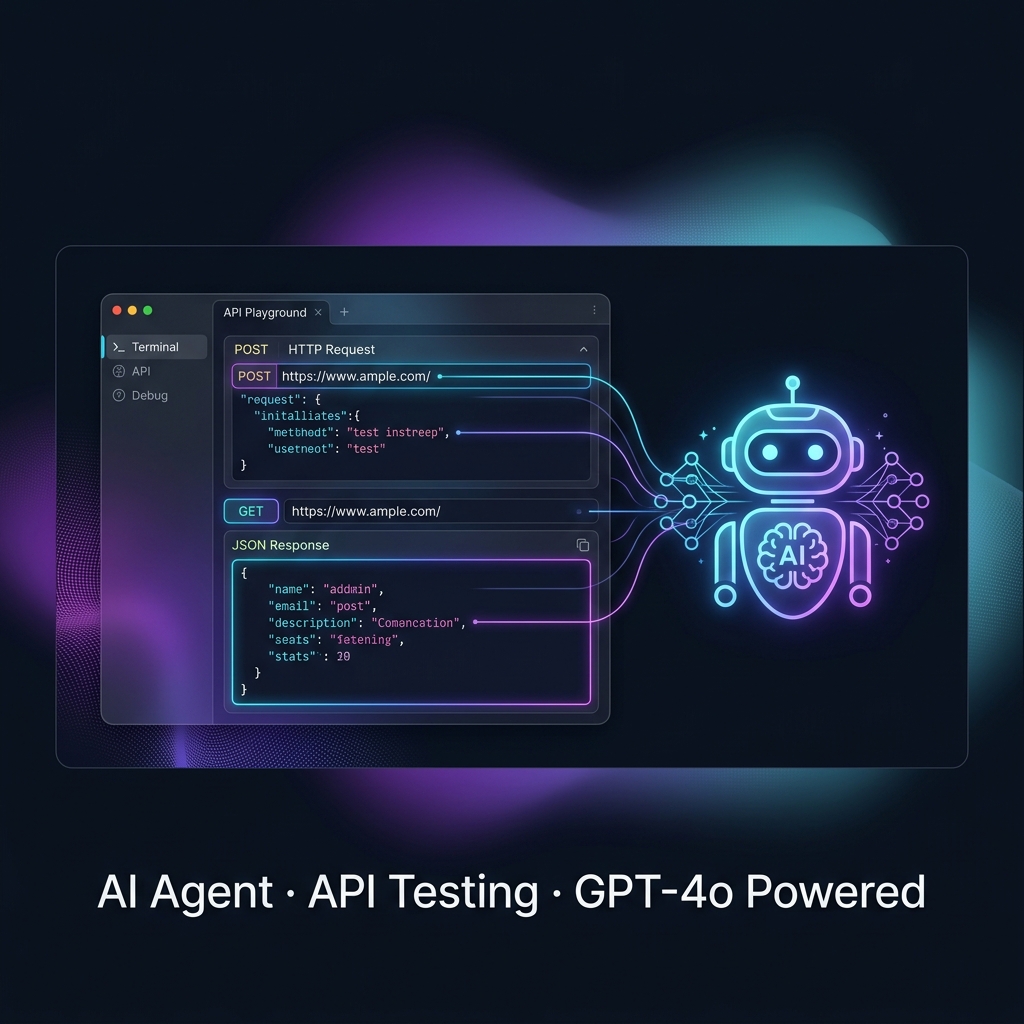
AI API Testing: Build and Debug API Requests with an Agent
Learn how to use API Playground's AI Agent to build, send, and debug API requests in plain English, including auth errors, bad payloads, and 422 responses.
Published June 17, 2026
Try the AI Agent Free → playgroundapi.com: GPT-4o powered API testing. No install. No sign-up. Just describe what you want and let the agent build it.
#Quick Verdict (TL;DR)
| What this tutorial covers | Using the API Playground AI Agent to call, build, and debug API requests using plain English |
| Who it's for | Developers tired of chasing cryptic API errors manually |
| AI model powering it | GPT-4o (OpenAI) |
| What still works without AI | Manual request building, but why bother when the agent can do it in seconds? |
| Most effective combination | AI Agent for building + debugging, manual editor for fine-tuning |
| Biggest time saver | The agent reads the error response and tells you *exactly* what's wrong in plain English |
| Is it free? | ✅ Yes. API Playground is fully free, no account required |
#Key Insights
- Developers spend an estimated 30–40% of API integration time not on writing code, but on *debugging*: chasing wrong headers, bad auth tokens, or malformed request bodies.
- GPT-4o's function-calling capabilities make it ideal for an API agent that can not only reason about errors but also take corrective action autonomously.
- The API Playground AI Agent doesn't just chat. It can read your current request state, fetch API docs, mutate the request fields, execute the call, and explain the response in one uninterrupted loop.
- Most API errors (401, 403, 422, 500) have patterns. An AI agent trained on millions of API interactions recognizes those patterns instantly.
- Browser-based AI agent testing means no local setup. The agent runs in your tab, the same place your request is being built.
#1. The Problem: API Debugging Is Exhausting
You've been there. You're integrating a third-party API (Stripe, Twilio, OpenAI, whatever it is) and the response comes back with a 422 Unprocessable Entity. The docs are a 40-page PDF. The error message is:
{
  "error": "validation_error",
  "message": "Request body is invalid.",
  "code": "ERR_422"
}
Helpful. Very helpful.
So you start the detective loop: Was it the Content-Type header? Did I forget to include Authorization? Is the field userId or user_id? Is the date format ISO 8601 or Unix timestamp? You tab between the docs, your request builder, your code editor, and Stack Overflow. Forty minutes later, you discover it was a missing "required": true field buried on page 34.
This is the problem the API Playground AI Agent solves. Instead of manually tracing errors, you hand the request to a GPT-4o-powered agent and say: *"Debug this."* It reads the request, cross-references the response, reasons through the failure, and comes back with an answer in plain English.
Let's walk through exactly how to do that.
#2. What Is the API Playground AI Agent?
Before diving into the tutorial, it's worth spending a moment understanding what you're actually using.
The API Playground AI Agent is a GPT-4o-powered autonomous assistant built directly into the API Playground interface. It's not a chatbot that gives you generic advice. It's a specialized agent that has *eyes* on your current request state and *hands* that can modify it.
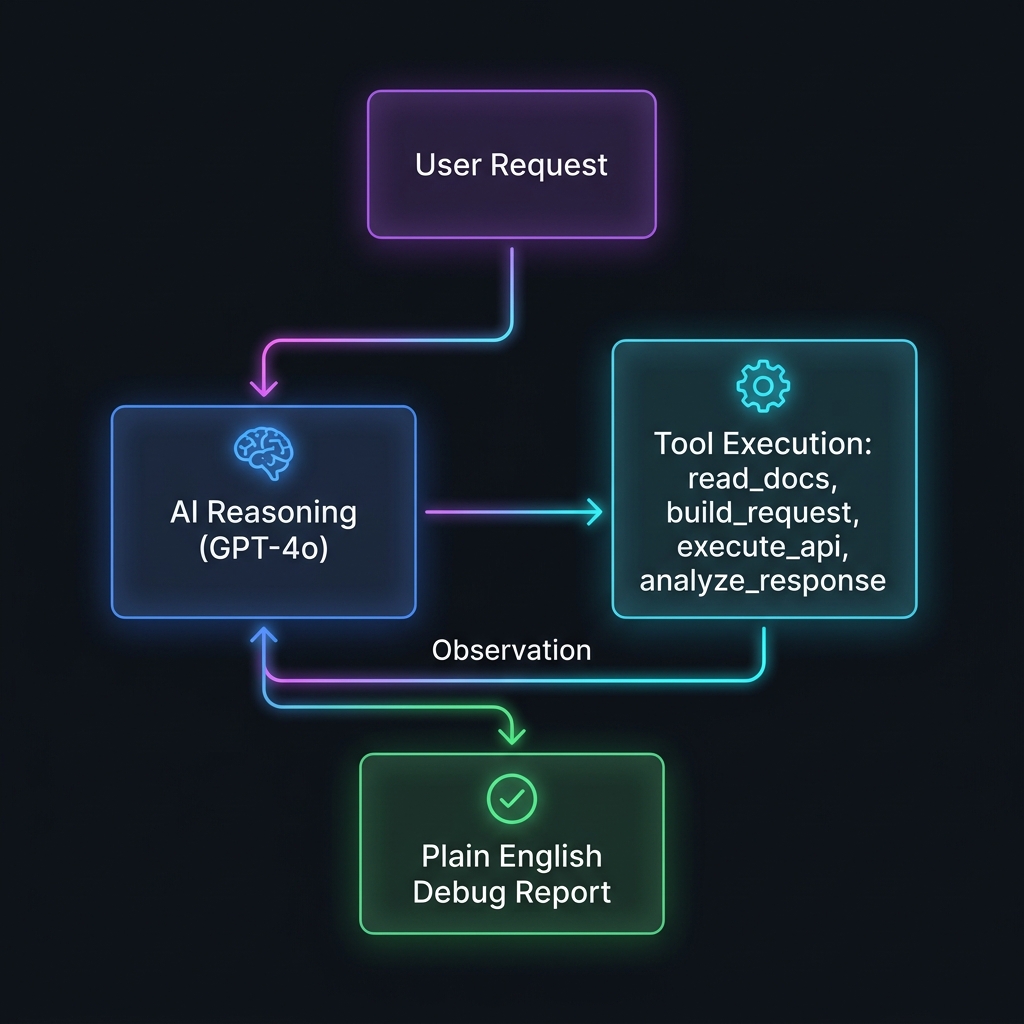
Technically, it follows a ReAct (Reasoning and Acting) architecture:
- Reason: The agent reads your goal (e.g., "test the /orders endpoint with auth") and figures out what it needs to do.
- Act: It calls one of its registered tools:
read_api_docs,update_request_state,execute_request, oranalyze_response. - Observe: It reads the result of the tool call (e.g., the API response, a schema field, an error code).
- Repeat: If the result reveals another problem, it loops back to Reason and tries again.
- Report: When it has an answer, it explains everything in plain English.
This loop is what separates an agent from a simple autocomplete suggestion.
#3. Getting Started: Opening the Agent Panel
#Step 1: Open API Playground
Go to playgroundapi.com. No account required. The full playground loads in under 2 seconds.
#Step 2: Find the Agent Button
In the top-right corner of the interface, you'll see the AI Agent button, a small glowing icon that looks like a neural spark. Click it.
This opens the Agent Panel, a side drawer that sits alongside your request editor. You can chat with the agent, give it commands, and watch it work in real-time without leaving the request builder.
#Step 3: Choose Your Agent Mode
The agent has three modes, accessible from the mode selector at the top of the panel:
| Mode | What It Does |
|---|---|
| Analyse | Read-only. The agent reads your request and response and explains what's happening. Best for debugging. |
| Build | State-mutation mode. The agent auto-fills your request fields (URL, headers, body) based on your description. |
| God Mode | Full control. The agent interacts with the UI as if it were a human: clicks, types, fills forms, and sends the request. |
For most daily workflows, Analyse and Build are what you'll use. God Mode is for complex multi-step flows.
#4. Tutorial: Using the Agent to Call an API
Let's start with the most common use case: you have an API endpoint and you want the agent to build the request for you.
#Scenario: Testing a Protected REST Endpoint
Imagine you're integrating a fictional e-commerce API and you need to create a new order. The endpoint is:
POST https://api.shop-example.com/v1/ordersYou know it needs auth and a JSON body, but you're not sure of the exact field names or formats.
#Step 1: Describe What You Want
In the Agent Panel, type your goal in plain English:
Build a POST request to https://api.shop-example.com/v1/orders.
Use Bearer token auth. The body should create an order for product ID "SKU-1234"
with quantity 2, shipped to customer ID "CUST-9876".
Hit Enter. The agent goes to work.
#Step 2: Watch the Agent Build the Request
In real-time, you'll see the agent populate your request fields:
Method: POST
URL: https://api.shop-example.com/v1/orders
Headers (auto-set):
{
  "Content-Type": "application/json",
  "Authorization": "Bearer <your-token>"
}
Body (auto-generated):
{
  "product_id": "SKU-1234",
  "quantity": 2,
  "customer_id": "CUST-9876"
}
The agent uses its knowledge of common REST API conventions to infer the correct field names and data types. It formats the JSON, sets the correct Content-Type, and scaffolds the auth header.
#Step 3: Add Your Actual Token and Send
The agent will prompt you to paste your Bearer token (it never stores or logs your credentials). Once you paste it, click Send, or tell the agent "send it" in God Mode.
#5. Tutorial: Using the Agent to Debug a Failed Request
This is where the agent truly earns its keep. You've sent a request and something went wrong. Let's walk through the full debug flow.
#The Setup: A 401 That Makes No Sense
You've sent a request to a GitHub API endpoint with what you *think* is the right token, and you get:
{
  "message": "Bad credentials",
  "documentation_url": "https://docs.github.com/rest"
}
You've triple-checked the token. It looks right. But something is wrong.
#Step 1: Switch to Analyse Mode
In the Agent Panel, switch to Analyse mode and type:
Debug my last request. I got a 401 Bad credentials from the GitHub API.
My token is set in the Authorization header.#Step 2: The Agent Inspects Your Request
The agent reads your current request state (every header, the URL, the method, the body) without you copying and pasting anything. It then reasons through the failure:
Agent Report: I can see the issue. YourAuthorizationheader is set to:Authorization: Bearer ghp_abc123...GitHub's REST API v3 requires the token to be prefixed withtoken, notBearer, for classic Personal Access Tokens:Authorization: token ghp_abc123...TheBearerprefix is only valid for GitHub Apps using installation tokens. Switch the prefix totokenand your request should succeed.
One sentence. The issue that would have taken you 20 minutes of Googling took the agent 4 seconds.
#Step 3: Apply the Fix
The agent offers to fix it for you. Click Apply Fix and it rewrites the header automatically:
{
  "Authorization": "token ghp_abc123..."
}
Send again. 200 OK.
#6. Tutorial: Debugging a 422 Validation Error
The 422 is arguably the most frustrating API error. The server understood your request perfectly. It just doesn't like the data you sent. Let's use the agent to crack it open.
#The Setup
You're calling a user registration endpoint:
POST https://api.myapp.com/api/users
Content-Type: application/json
Authorization: Bearer your_token

{
  "name": "Asim Ahmed",
  "email": "asim@example.com",
  "dob": "1995-03-15"
}
Response:
{
  "error": "VALIDATION_FAILED",
  "fields": [
    { "field": "dob", "code": "INVALID_FORMAT" }
  ]
}#Step 1: Ask the Agent to Explain the Validation Error
In the Agent Panel, type:
I got a 422 VALIDATION_FAILED on the "dob" field.
The format I'm using is "1995-03-15". What format does this API expect?#Step 2: The Agent Cross-References the Schema
If you've loaded API documentation or an OpenAPI spec into the playground, the agent reads it. Even without docs, it applies its training on common date format conventions and responds:
Agent Report: The fielddobis returningINVALID_FORMAT. Your current value"1995-03-15"is ISO 8601 date format (YYYY-MM-DD). Common causes of this error include: 1. The API expects Unix timestamp: Try793497600(the Unix timestamp for March 15, 1995) 2. The API expects DD/MM/YYYY format: Try"15/03/1995"3. The API expects a datetime string: Try"1995-03-15T00:00:00Z"My recommendation: Check if the API documentation specifies thedobfield type. If it saysinteger, use Unix timestamp. If it saysstringwith patternDD/MM/YYYY, use option 2. Want me to try all three formats and show you which one returns a 200?
The agent doesn't just explain. It offers to *actively test* the fix for you.
#Step 3: Let the Agent Test All Three Formats
Click Auto-Test Variants and the agent sequentially sends three requests with each date format, then reports back:
The Unix timestamp works. The agent updates your request body automatically:
{
  "name": "Asim Ahmed",
  "email": "asim@example.com",
  "dob": 793497600
}
Done. What could have been an hour of trial and error took 60 seconds.
#7. Tutorial: Using God Mode for Complex Multi-Step Flows
Some API workflows aren't a single request. They're a chain. You need to authenticate first, capture a token from the response, then use that token in a second request. This is where God Mode shines.
#The Setup: OAuth Token Exchange + API Call
You're working with an API that uses OAuth 2.0. The flow is:
POST /auth/tokenwith yourclient_idandclient_secretto get an access token- Use the access token to
GET /api/protected-resource
Doing this manually means: build request 1, send it, copy the token from the response JSON, build request 2, paste the token. If the token expires, repeat.
#Step 1: Describe the Full Flow to the Agent
In God Mode, type:
I need to do a two-step OAuth flow.
Step 1: POST to https://api.service.com/auth/token with client_id "my_client" and client_secret "my_secret".
Step 2: Extract the access_token from the response and use it as a Bearer token to GET https://api.service.com/api/protected-resource.
Run the full flow and show me the final response.#Step 2: Watch the Agent Execute the Chain
The agent runs the chain autonomously:
🔵 Step 1: Building POST /auth/token...
🔵 Sending auth request...
✅ Got 200: access_token: "eyJhbGciOiJIUzI1NiIs..."
🔵 Step 2: Building GET /api/protected-resource...
🔵 Setting Authorization: Bearer eyJhbGciOiJIUzI1NiIs...
🔵 Sending request...
✅ Got 200: Response received.
The agent shows you both the intermediate auth response and the final protected response, side by side. No copy-pasting. No token expiry race condition.
#8. How the Agent Understands Your API (Without Docs)
A common question is: *"If I don't provide API docs, how does the agent know what fields to use?"*
GPT-4o was trained on an enormous corpus of publicly available API documentation, GitHub repos, REST API design guides, and OpenAPI specs. This means it has implicit knowledge of:
- Common field naming conventions (
user_idvsuserIdvsuserId) - Standard authentication schemes (Bearer, Basic, API Key, OAuth 2.0)
- Typical error code meanings (401, 403, 404, 422, 429, 500)
- Common date formats, pagination patterns, and content types
For proprietary or internal APIs, you can paste your OpenAPI spec (YAML or JSON) directly into the Agent Panel's Docs tab. The agent then has a precise schema to work from, drastically improving its accuracy.
openapi: 3.0.0
info:
  title: My Internal API
  version: 1.0.0
paths:
  /users:
    post:
      requestBody:
        required: true
        content:
          application/json:
            schema:
              type: object
              required: [name, email]
              properties:
                name:
                  type: string
                email:
                  type: string
                  format: email
Once you paste this, the agent knows exactly which fields are required, what types they expect, and what validation rules apply. 422 errors become nearly impossible.
#9. AI Agent vs Manual Testing: When to Use Which
The agent is powerful, but it's not always the right tool for every moment. Here's a practical guide:
| Task | Use AI Agent? | Why |
|---|---|---|
| Quick GET request to a known endpoint | ❌ Manual | Faster to just type the URL |
| POST with complex nested JSON body | ✅ Agent | Agent generates correct schema instantly |
| Debugging a 401/403 | ✅ Agent | Agent recognizes auth patterns immediately |
| Debugging a 422 validation error | ✅ Agent | Agent tests field variants automatically |
| Multi-step OAuth flow | ✅ Agent (God Mode) | Automates token extraction and chaining |
| Testing an endpoint you've used 100 times | ❌ Manual | Collection shortcut is faster |
| Exploring an unfamiliar API for the first time | ✅ Agent | Agent reads schema and guides you |
| Writing automated test suites | ❌ Code | Use a dedicated testing framework |
#10. Under the Hood: How the Agent Is Built
For the technically curious, here's a quick look at the architecture powering the agent.
#The ReAct Loop
Every agent action follows the Reasoning + Acting loop:
- Thought: GPT-4o reasons about the current state and decides what tool to call next.
- Action: It calls a tool from the registry.
- Observation: The tool returns a result (an API response, a schema, a DOM snapshot).
- Thought: GPT-4o processes the observation and decides the next step.
- Final Answer: When the goal is achieved, it surfaces the result to you.
#Tool Registry
The agent has access to a set of specialized tools it can call autonomously:
| Tool | What It Does |
|---|---|
read_api_docs(endpoint) | Fetches the OpenAPI schema for a given endpoint path |
read_request_state() | Reads your current URL, method, headers, and body |
update_request_state(config) | Mutates the playground fields directly via React state |
execute_request() | Fires the API request and returns the full response |
analyze_response(response, schema) | Cross-references the response against the expected schema and explains discrepancies |
click_element(id) | God Mode: simulates a click on any UI element |
type_text(id, value) | God Mode: types into any input field |
#Why GPT-4o?
GPT-4o was specifically chosen for the agent's reasoning layer because of:
- Function calling: GPT-4o's native function-calling API allows the agent to select tools from the registry reliably, even in complex multi-step chains.
- JSON mode: Ensures tool call arguments are always valid JSON, preventing malformed state updates.
- Context length: GPT-4o can hold your full API schema, request history, and current state in a single context window without losing important details.
- Speed: GPT-4o is fast enough for real-time, interactive debugging without noticeable lag.
#11. Tips for Getting the Best Results from the Agent
After using the agent across hundreds of API integrations, here are the patterns that consistently produce the best results:
#Be Specific About the Endpoint
Instead of: *"Test my API"* Say: *"POST a request to https://api.myapp.com/v1/payments with a Stripe-style payment intent body"*
#Paste the Error First, Then Ask
Instead of asking a vague question, paste the full error response first:
Here's the response I got:
{"error": "invalid_grant", "error_description": "Token has been expired or revoked."}

Why is this happening and how do I fix it?#Tell the Agent What You Expect
The agent performs much better when it knows what a *successful* response looks like:
I expect the response to be a 200 with a JSON body containing "id", "status": "active", and "createdAt".#Use the Docs Tab for Internal APIs
Always paste your OpenAPI spec for internal or proprietary APIs. It takes 10 seconds and cuts the agent's error rate dramatically.
#Trust the Auto-Test Variants Feature
When the agent offers to test multiple variants (different date formats, auth schemes, content types), let it. It's faster than doing it manually and it logs all the attempts so you can compare.
#12. Frequently Asked Questions
Does the AI Agent send my data to OpenAI?
The agent uses the GPT-4o API to reason about your request. Your request state (URL, headers, body structure) is sent to the OpenAI API as part of the prompt context. Your actual API keys and Bearer tokens are *never* included in the prompt. They are substituted with placeholders during agent reasoning and only inserted at the browser level when the actual request is fired.
Can the agent work with GraphQL APIs?
Yes. You can describe GraphQL queries in plain English and the agent will construct the correct POST request with the appropriate Content-Type: application/json header and a JSON body containing query, variables, and operationName fields.
What if the agent gives me wrong advice?
GPT-4o can make mistakes, especially on obscure proprietary APIs. Always review the agent's suggested fixes before applying them to production credentials. The agent is a suggestion engine, not an oracle. For unfamiliar APIs, paste the official docs or OpenAPI spec to ground the agent's responses in verified facts.
Does the agent store my request history?
Your request history is stored locally in your browser's storage, the same as the non-agent playground. Nothing is persisted on API Playground's servers.
Can I use the agent with APIs behind a VPN or on localhost?
Yes. Since the agent runs in your browser and requests are fired from your browser, it can reach any URL your browser can reach — including http://localhost:3000, https://internal.company.com, or anything behind a VPN that your machine is connected to.
Is God Mode safe? Can it accidentally delete data?
God Mode has a built-in confirmation gate: before executing any request that uses a non-idempotent method (POST, PUT, PATCH, DELETE), the agent pauses and shows you exactly what it's about to send. You approve before it fires. You can also disable God Mode entirely and use only Analyse and Build modes for read-only safety.
What's the difference between the AI Agent and the regular AI Autocomplete?
Autocomplete is reactive: it suggests things as you type. The AI Agent is autonomous: you give it a goal, and it takes multiple steps to achieve it, including sending requests and reading responses. Autocomplete is for speed; the agent is for complexity. ---
#13. Conclusion: Let the Agent Do the Hard Part
If there's one thing I want you to take from this tutorial, it's this: the frustrating parts of API testing are now optional.
The 401 that sends you down a 30-minute rabbit hole? Hand it to the agent. The 422 with a vague validation error? Hand it to the agent. The OAuth token exchange you always forget the exact flow for? God Mode handles it.
The API Playground AI Agent, powered by GPT-4o, doesn't eliminate API testing. It eliminates the *tedious, repetitive, manual* parts of API testing so you can focus on the part that actually matters: building your product.
Start with Analyse Mode to debug your next failed request. Once you see how fast it diagnoses the issue, you'll never go back to squinting at raw error JSON alone.
Open the AI Agent at playgroundapi.com — free, no account, GPT-4o powered.
*Have a specific debugging scenario you want covered in a future post? The workflows above cover the most common cases, but every API has its quirks. Drop a comment below and I'll cover your use case in the next tutorial.*